Thursday 27 January 2022

Review of test shoot

After editing the footage I discovered how important a test shoot really is because it made us (as a group) realize things we hadn't considered before. I think that our idea does look really good and the opening scene is very engaging. Although, I don't know if we conveyed the storyline in the best light, and after opinions from peers they voiced that it can be quite confusing at times, although this could be down to the lack of costume.

The recommended time for the title sequence is over 2 minutes, although our sequence is only just over 1 minute, a way in which we could make it longer is to use more establishing shots as well as change the pace of the shots when editing. Key scenes that can add significant time to the overall sequence are the death scenes of both characters (girl and hunter), by elongating these, more tension is created for the audience as there is more of a struggle for the victims, this will also appear more realistic to the audience. Moreover, when filming our opening title sequence we only shot the duration necessary, next time we will certainly shoot for longer in order to get all the shots and more that are necessary for our final product. Although, I would say the pace does indeed vary within the scene and if some scenes were any longer, the audience could potentially lose their engagement early on in the tile sequence. Additionally, tension has been created through the use of fast-paced editing as well as a variety of camera angles and compositions.

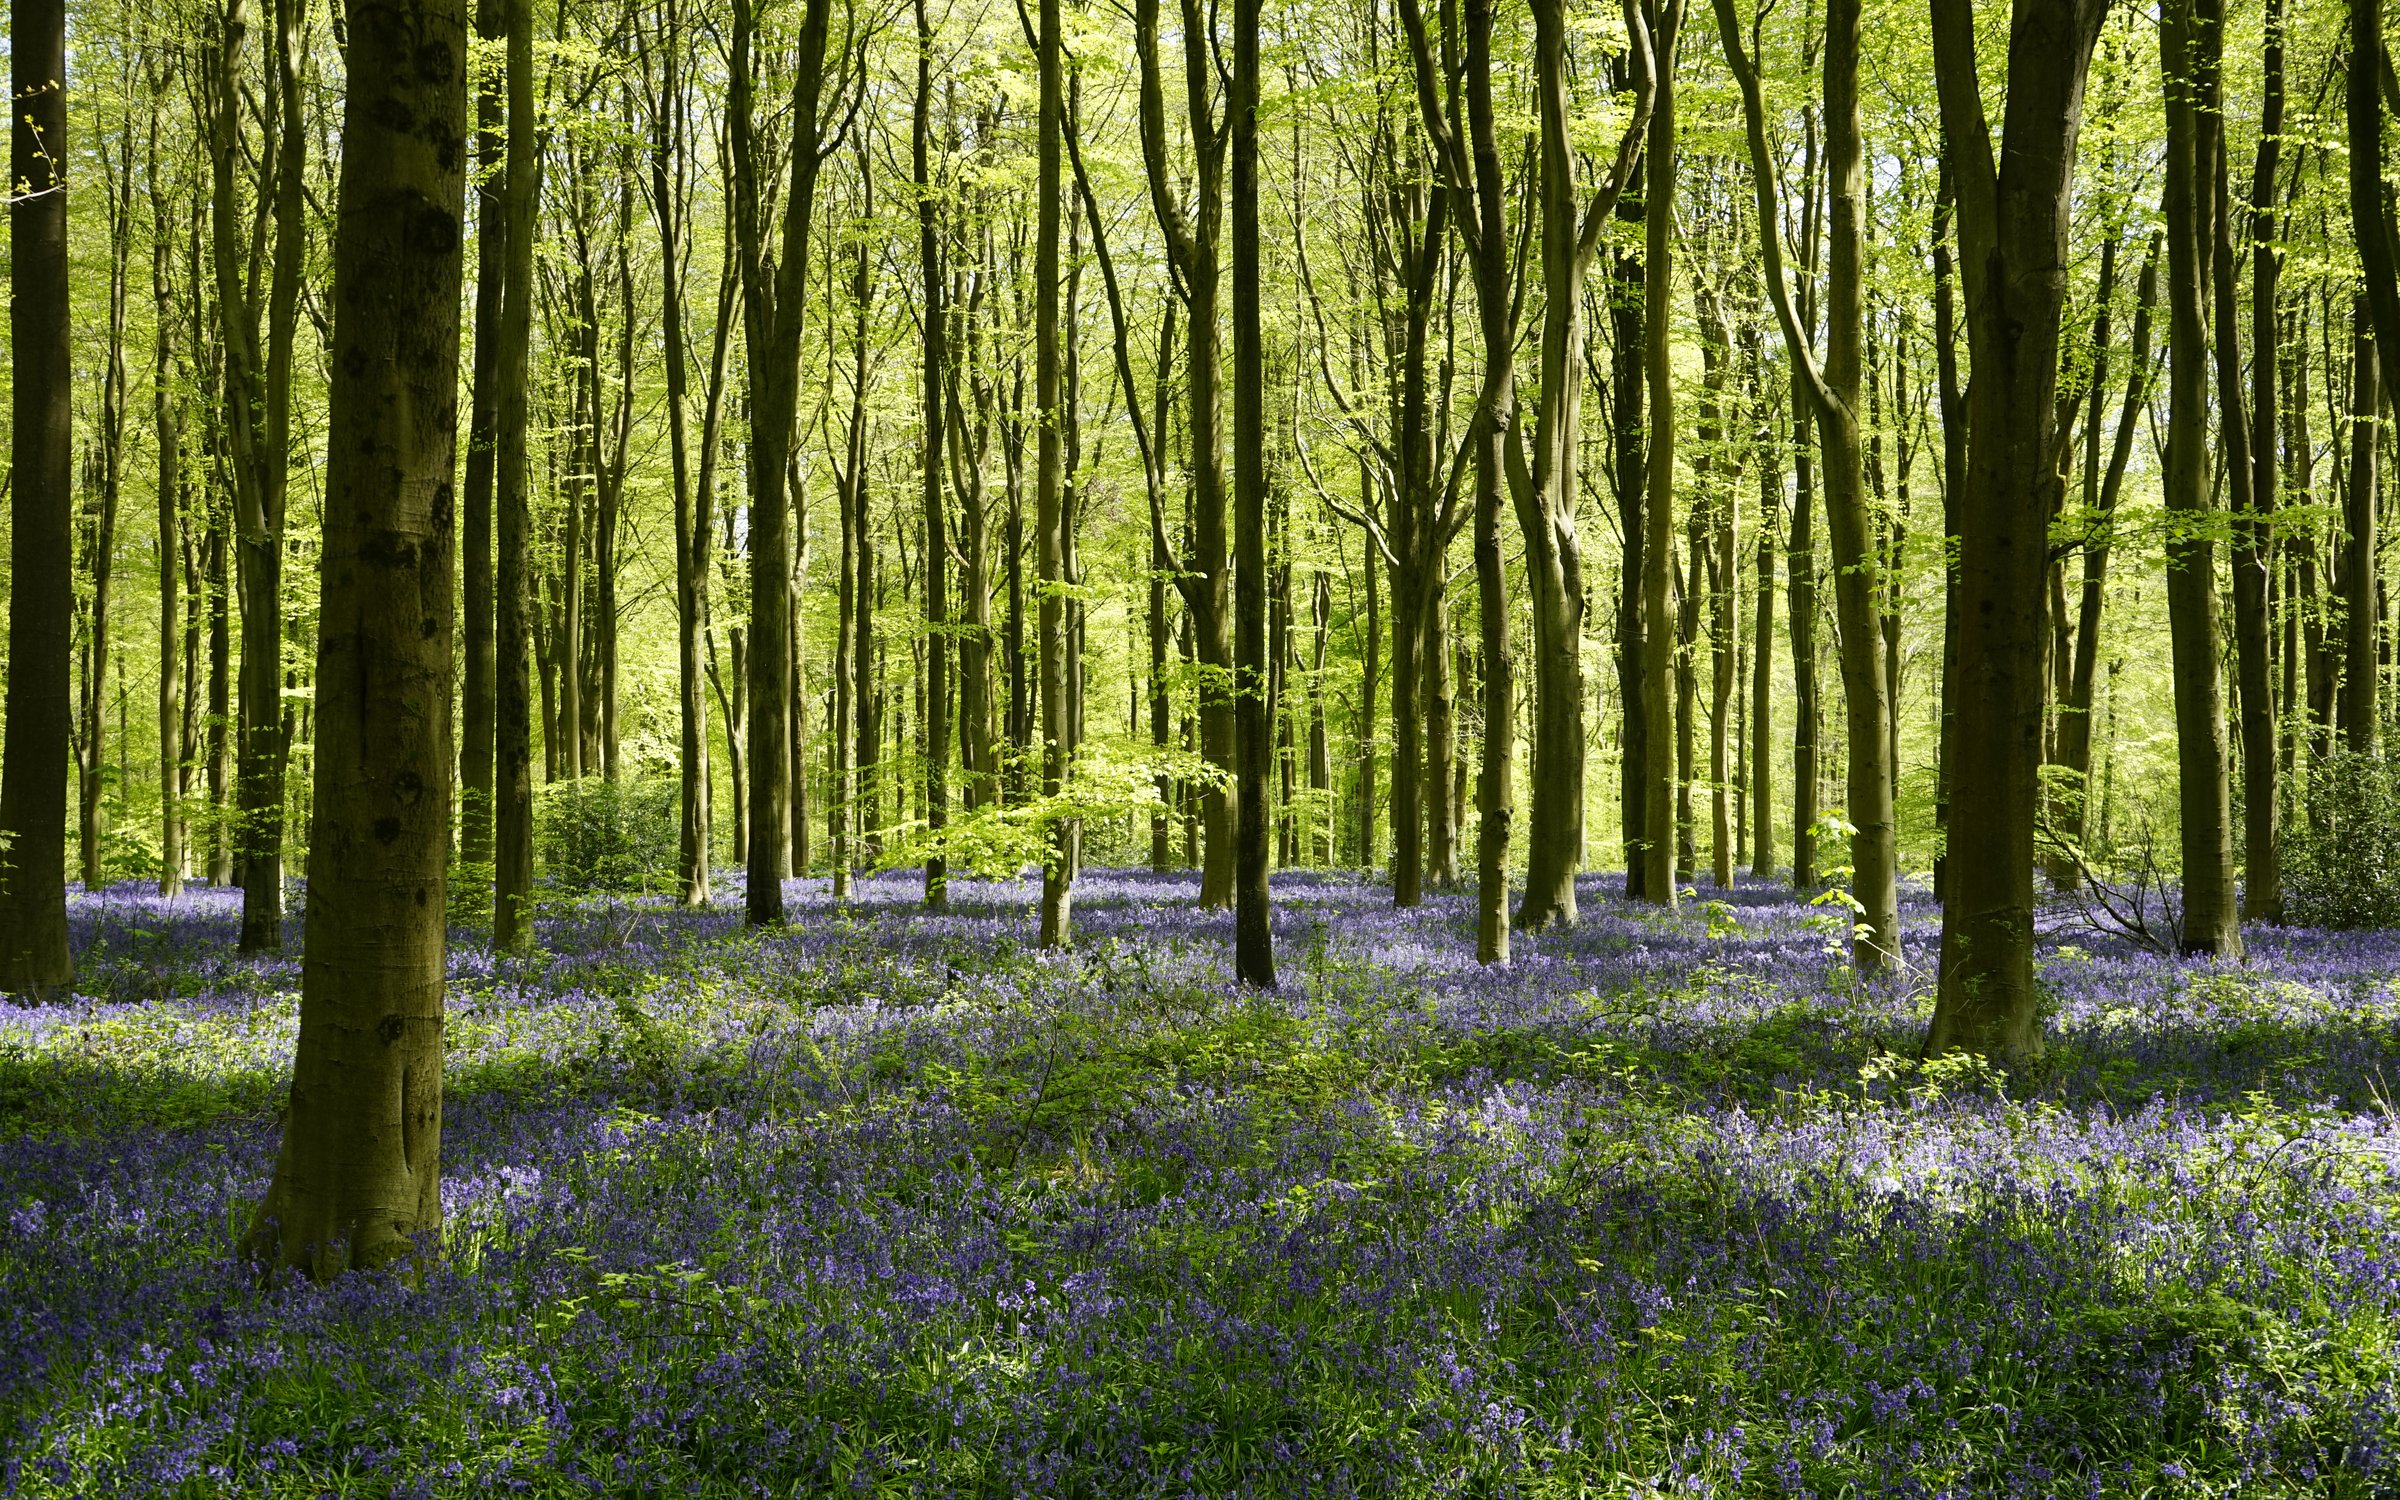
The narrative is relatively clear although there are some aspects of it that appear unclear such as the back story, although this is intentional to create suspense. I showed our test shoot to a few of my peers and they brought up the location as well as specific props. Martha M suggested that often shoots don't take place in open woods, therefore changing the location to somewhere more 'realistic' for a shoot would make the entire scene clearer and help to dissect the narrative for the audience. A key point that was raised by numerous people is the use of mise-en-scene and how important it will be within our real thing as the use of costume alone tells its own story, despite this being intentional during our test shoot to have no costume (lack of preparation time) we, as a group do need to put more thought and consideration into the specific details within mise-en-scene.

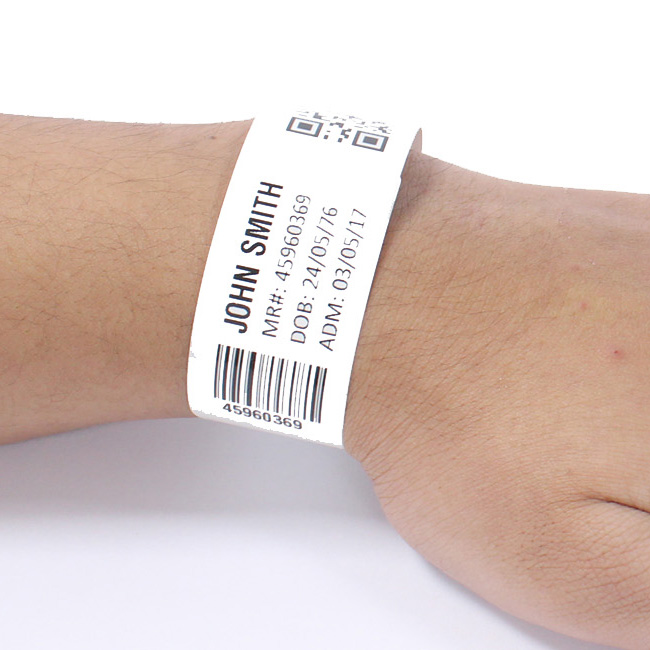
We used a variety of camera angles and movements which I believe have worked effectively to convey our intended opening title sequence. I think that the combination of wide-angle shots and close-ups worked well together as they helped the sequence flow, as well as exaggerate where the audience's attention should be, for example, in the first 5 seconds a girl gets killed, and a close up shows a special bracelet being taken off her wrist, the use of the close-up enhances the sport like element as we're shown the man taking the bracelet and adding it to a supposed collection of bracelets in his pocket, suggesting that this is a much larger scale than we had anticipated. moreover, the bracelet further links into the narrative as well as continuity as the protagonist also wears one, which suggests that they are the trophy. Although, we certainly do need to develop certain camera angles and movements and use an even wider variety to create tension as well as show the scale of the hunt. Moreover, we lacked establishing shots which are incredibly important at establishing location, and even to add to the sequence to lengthen it.

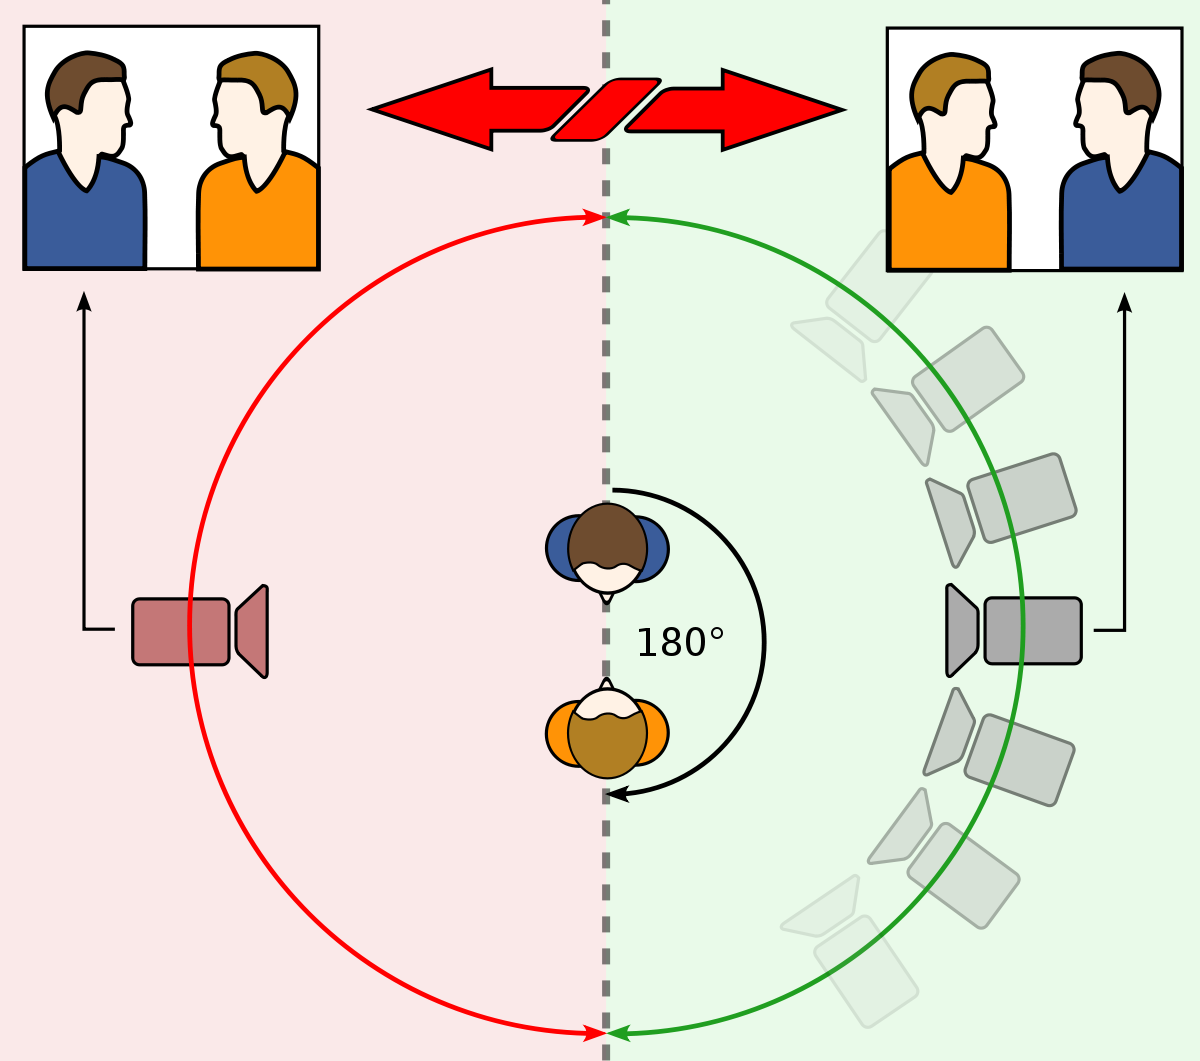
I think that the actual plot has been portrayed successfully in our test shoot, although when it comes to the real thing I think we need to focus more on sound than we did this time! I edited the footage and had to add sound effects to several of the scenes to cover up background dialogue, therefore when we do our actual shoot we know that when filming we have to wait a few seconds before commencing the acting after saying "action!" as in several of the scenes this can be heard alongside "cut!" which I had to mute. Moreover, the ambient sound of the forest helps to establish the location. When we do it next time, we need to make sure to show both main characters equally, as during our test shoot we focused more so on the hunter as opposed to the girl, we could use cutaway shots to heighten the tension between the two.

Overall, our test shoot went better than I had anticipated, and we can use it as a learning curve for when we do our actual shoot. I think that the basic guidelines and action that occurred in the title sequence is roughly how the real thing will go. Although, a major part within the sequence that I think needs changing is the death of the girl at the beginning, whereby I think by exaggerating her death the audience are encapsulated and gripped to the plotline, moreover this will also make the entire sequence longer and closer to the two-minute mark.


test shoot (edited)


Wednesday 26 January 2022

working with our group despite covid

One of the members in our production group contracted covid, therefore during our filming we were constantly texting him via WhatsApp to ask for his ideas and opinions, this was helpful as it gave the opinion of someone who wasn't actually with us, therefore, he was able to watch the footage back and give his opinions as to what he thought about it and how we can improve in the future. Although, due to his departure we had to replace him during our test shoot and he wasn't able to edit, therefore I had to step in and edit the footage.

Test shoot

On Wednesday 26th January, my group and I shot a test shot of our proposed idea.

Test shoots help us to dramatically improve our final piece as they show you what works well and what you could change if you do it again. I believe our shoot went well, although as a group we agreed that we hadn't really put enough thought into all of the shots we needed, therefore we ended up doing several takes using a significant number of angles to make sure we shot everything necessary. 

We were given an hour to film our entire opening scene. We shot it on an iPhone 13 Pro Max and used only handheld shots. Due to one of the members in our group having covid we had to use a peer to fill in as an actor. Although apart from that, each of us in our group had a go at acting, filming, and directing. Due to it only being a test shoot, we replaced a prop gun with an umbrella and we used a stick as a knife.

We decided to shoot the scene with the extra in first, therefore he didn't have to hang around when he wasn't needed. All of our scenes were set in the woods, therefore there wasn't a specific order we needed to shoot in, so we decided to do it by the actor. We first shot all of Will's (the hunters') scenes, we then followed it by Bea's (the girl) scenes, and then we finally shot their scenes together, whereby she attacks and kills him. 

I took the role of the camera operator, I had to think about the composition and angle of the camera, this alone can change the scene from mediocre to incredible. We used lots of handheld shots to give the audience a more personal feel and to enhance the suspension as the shots accompanied the characters running. Moreover, we used a mix of high and low angle shots to portray power, for example, once the girl has killed the hunter we show her throwing a stick on him using a low angle shot to portray her as more powerful than him as she is looking over him.


Tuesday 25 January 2022

planning the shoot

 Locations:

  • woods

In our actual shoot, we will be shooting in the woods. Our school is situated amongst woods, therefore it will be easy to use them in our filming.

Characters:


  • Two girls (one that gets their throat slit and one who on the run)

Bea + Daisy

  • Two men (hunters)

Cole + Will

There are 4 of us in our production group (two boys and two girls) and our idea has four people in it (two boys and two girls) therefore we can delegate ourselves to play these roles. At no time in the sequence will all four characters be in the same frame, therefore we will still be able to film it without adjusting our sequence to our limited crew and cast.


Props:


  • Fake gun (umbrella)

  • Fake knife (ruler)

In our opening title sequence we use a couple of weapons that we won't be able to use in our test shoot, therefore we will have to substitute an umbrella for a gun and a ruler for a knife.

Rules and equipment for your shoot:


  • Cole (editor/actor)

  • Daisy (camera opp/actor)

I will use my phone to film the test shoot. Moreover, I will bring in a tweed jacket and flat cap to show some differentiation between the men and girls.
  • Bea (director/actor)

  • Will (camera opp/actor)

Will is bringing in an umbrella which we will use to replicate a gun.

development

My group and I have begun to focus on smaller details that help to represent the narrative, such as costumes and props. Mike and Luke both suggested, that our concept of the girls wearing ball gowns from the night before may be too far-fetched as that would present the girls as cared for by the men as they would have had a ball. Whereas the reality of our story would be that the girls have been almost dehumanized as they've been shipped off to a 'billionaires playground', whereby the men have zero care about the girls. 

An idea we were talking about would be for all of the girls to be in jumpsuits or just wearing the same clothes, with some sort of number spray-painted or imprinted on them to show differentiation within some sort of game. This costume would clearly differentiate the men from the women, making the women appear as characterless and as if they are all the same, this would heighten the personality of the protagonist, as she could alter her costume in some
way to show her survival skills, giving subtle hints to the narrative and her personality to the audience. 

Additionally, the girls could be wearing dog tags or some sort of wristband to reflect their numbers and identity. Therefore, when the hunters kill the girls, they must take the identifiable token from them in order to get a reward for the more kills they get. 

To conclude, the men will most probably wear tweed, as automatically shows the audience that they're nothing to do with the army nor anything like that and that the hunt that they're on is probably based around men that have too much money. Although, the use of tweed turns the narrative into a class and money argument, and portrays the upper class in a worse light. 


research into how a girl can overpower a man in a fight

I chose to research how a girl can overpower a man in a fight. There weren't many results, therefore I have used videos as well as articles to conduct my research. Knowing how a girl is able to overpower a man far bigger than her is not only important to know for everyday life but it will be extremely important within our opening scene, as our protagonist needs to be able to beat up a hunter who is armed and far bigger than her. 

Women are stereotypically portrayed as helpless and referred to as 'a damsel in distress', therefore by our protagonist being portrayed as a strong, powerful woman this subverts the common stereotype and makes the audience want to know more about her in the rest of the movie and how she ended up where she is.

There’s no set way for someone to successfully attack someone bigger and stronger than them. Although there are specific tips and strategies that can help.

  • skill is necessary. If you don’t have good footwork nor know how to throw good punches you’re at even more of a disadvantage than just being smaller and weaker.
  • Bridge the gap between you and them. Their arm range is going to be much further so they'll be able to throw some powerful punches, by bridging the gap they'll have less of an advantage.
  • Combinations. swap between striking them high and low, the throat and groin are weaker places - this will stun him. Moreover, jump high and headbutt their head, then grab the weapon and kill them.
  • Catch them off guard.

One extremely crucial tip for a smaller opponent is to fully use their strength. 
For example, if she were to want to grab his ankle to then push him over, she would have to push him to the ground by his head for him to focus his strength on his upper body and be able to stand back up. Then she would be able to grab his ankle and push him over successfully.  So by combining techniques, she is able to gain more strength.


Despite the many tips and tricks, for our sequence, these will be extremely hard to pull off as the man has a gun. A solution to this will be for the girl to either know how to successfully disarm a gun or how to attack the hunter from behind, as these will be more effective and believable in this scenario for the audience watching.


This brief video teaches one how to disarm a shotgun. First of all, you subtly move out of the line of fire of the barrel. His right hand will most likely be holding the main weight of the gun, so it is necessary to counteract that by using your left arm to push the back of the gun down and use your right arm to lift the gun from the front, this motion will seemingly hit him in the face and then turn the weapon so that the barrel faces him. Finally check that the safety catch isn’t on and that if you needed to, you were able to shoot him. 


Sunday 23 January 2022

research into fake blood

I have chosen to research fake blood, which will be extremely important within our opening title sequence as the first shot alone will be of a woman being brutally killed. 

The video I watched showed numerous ways to make fake blood as well as how to make different consistencies. I really liked this video as the creator used ingredients that people tend to have at home, and her instructions were also very clear.

Ingredients 
For thick blood:
- Maple syrup (alternatives: corn syrup/golden syrup)
- Water
- Red and blue food colouring
- Gelatin powder

For stage blood:
- Icing sugar (powdered sugar)
- Water
- Red, green and blue food colouring
* Optional cocoa powder

Thick blood
The first step to making the thicker blood is to pour a cup of maple syrup into a bowl, then you must put half a cup of water in the mixture, the ratio of water to syrup is 1:2, so depending on how much fake blood you want to make, this ratio is important. Once you've stirred your syrup and water together you're ready to add the red food colouring, two teaspoons is recommended although it is a personal preference and obviously depends on the quantity you're making. Be careful when adding the blue food colouring, if you add too much it can go purple! So, you need to add about a quarter or half of a teaspoon to the mixture and then stir it. Next, to make the texture thick and blood like we need to add two teaspoons of gelatin powder and then stir until it is dissolved. Finally, to activate the gelatin we need to put the mixture in the microwave for around 10 seconds, if it is not microwaved it will set at a jelly-like consistency.


Stage blood
First of all, you need to add two cups of icing sugar to a container (that you can put a lid on and it won't spill!) then add a cup of water and shake the mixture until both ingredients have combined together. Next, add around 1.5 teaspoons of red food colouring, the amount of food colouring very much depends on personal preference as well as the quantity you're making. Then add a drop (a quarter (or less) of a tea spoon) of blue and green food colouring to the mixture to make the colour deeper. The final step of making the blood is optional, and that would be to add a tablespoon of cocoa powder, this gives it more of an opaque look and makes it look more blood-like than red water! Finally, give the mixture a good shake and then its ready to use.


Fake blood will be crucial within our opening scene, and the consistency and colour of it also play a major role in making our opening scene appear more realistic. Despite the ease of making fake blood, an easier alternative would be to buy it pre-made blood, which can be bought for around £1.99! Or for 0.5 litres it will be £16. 

Mood board


development

After receiving feedback from our initial developed idea we as a group have decided to act on it.
Our title sequence now consists of:


Moreover, we have decided that there will be no dialogue at all within the opening scene. This will heighten the ambient sound and make it more suspenseful and mysterious. Although, at the end - we may potentially have a soundtrack play as she walks away from the hunter's dead body to make her appear more powerful and portray her as a badass.
Finally, the feedback we got helped us gather more information as to what the rest of the motive is about and most importantly what her motive is... the storyline is that a girl met a boy at uni, he takes her back to his family home for a supposed family dinner, etc. although little does she know, his family has annual shoots and this specific one had been arranged for a long time whereby each man in the family brings a girl home which will be a part of a "manhunt". Although the protagonist and her boyfriend do genuinely love each other and he realizes this when she is left to her own devices and being hunted, so he goes to stop them from killing her which ends up in him being killed, she finds this out and that's where her further determination is discovered, so her motive is to kill the men who killed her boyfriend.


Friday 21 January 2022

feedback for concept idea

After speaking with Luke (Head of Production) he suggested some areas that will improve our overall concept, this includes: 

The establishment of "the hunted becoming the hunter" earlier on, a way in which we could do this is through the use of non-obvious traps which state the woman's ability and power without directly linking her to them. Showing the woman as the hunter from the offset makes the audience question the scenario more as she is portrayed as a strong woman which subverts the common stereotype of a woman in the woods, moreover by making it clear that the hunted are the hunter this sets the tone for the rest of the title sequence and movie.

Another point Luke made is the use of sound. Our proposed sequence has two hunters and two girls on the run, the two hunters are "friends" and could potentially chat to each other, although as a group we decided that little to no dialogue could create further suspense and enhance the thriller genre. The use of pleonastic sounds such as the wind and breathing could further add to the suspense and eerie vibe. Having no dialogue at all leaves more of the plot to the audience's imagination, although we will give further hints to the narrative through the use of props, actors, and location.

Moreover, we discussed the use of titles and how necessary they will be, as a group we decided that a full title sequence probably won't work with our opening scene. Subsequently, we could go from a black screen at the beginning whereby we have a bold title displaying the funding company name and then it suddenly cuts to a girl getting killed, and then at the end of the scene, we leave the audience on a cliff hanger and then cut to a blank screen with a title of the production company. The lack of titles doesn't steer the audience's attention away from what's actually going on in the scene.

Additionally, it was pointed out to us that when looking at the screen audiences read it from left to right, similarly to a book. Therefore, if the antagonist walks into the shot from the right side onto the left this creates an eerie vibe from the offset and connotates bad vibes from the offset.

In contrast, Luke suggested that we could do it in an abstract fashion, whereby we use extreme close-ups as well as more shots of the woodland area and sound to create an eerie vibe. The lack of characterization and hints to the narrative helps to grip the audience and make them want to carry on watching.

To conclude Luke suggested that we should consider only killing one of the huntsmen as oppose to both, by doing this the suspense within the opening scene is heightened as the audience are unaware of potential events that are going to unfold. moreover, we are proposing to have our opening scenes plot be the penultimate scene in the entire movie, therefore by killing one person as oppose to two the audience doesn't fully know the ending to the movie.

Thursday 20 January 2022

group pitch, idea 2


We had to present two concept ideas to our class so that at least one idea is tangible or if another group within our year is doing a similar concept. By working on a second idea it pointed out faults in our main idea, therefore helping us to develop that.

group pitch, main idea


My group and I worked together to create a presentation to show our class and teachers the concept we propose to pitch. By working together we were able to develop our idea as well as delve deeper into our original concept.

Wednesday 19 January 2022

How we decided on our group idea

As a group, we sat down and presented all of our ideas to one another. We all chose our favorite idea and the ones we thought would work best once developed. We settled on Beas idea, surrounding a woman walking along the street listening to a dietetic soundtrack which we (the audience) can hear through her headphones, she's being followed although the man's identity isn't disclosed until the girl turns a corner and she's holding a gun to his head. We also liked Will's idea of a bride who has been kidnapped although turns out to be a killer, so for our final idea which we propose to take forward, we have combined elements from both to create a new, improved concept.

Tuesday 18 January 2022

Camera workshop 2

 On Tuesday 18th January my class and I had our second camera workshop. We learned the 180-degree rule which is probably one of the most important rules in filmmaking, it consists of an imaginary line that stretches between two actors and states that the camera cant cross this point, this helps with consistency within the movie and prevents confusion to the audience; the camera can go anywhere within the 180 degrees, although it can't cross the imaginary line. Moreover, rules of thrids are important and work alongside the 180-degree rule;

the rule of thirds is the positioning within the frame, the frame of the camera is divided into 9 boxes, and where you position the object you're filming is extremely important. By not only using the middle quadrants this creates further meaning to the scene as the audience or able to see beyond just the action.
When filming, often you shoot wide shots first even though in editing they may be used last or not at all. This is because often wide shots can be used as fillers and every detail involved in the scene is shown, therefore starting with a wide shot and shooting the extreme close-up last, this sets the scene and shows the action necessary to fulfill the scene.

Continuity is what makes the scene flow and believable as an actual real-life event, continuity is the small details that continue over several shots, for example, if in the wide shot the actor raises his right hand but in a close up he raises his left arm, when edited together, the scene won't flow nor make sense to the audience. Marks work alongside continuity, as they tell the actor where to position themself, often on shoots tape marks out a place for each specific actor to stand, although today - we used the lens cap to reinforce the continuity when taking several shots.

"Stand by", "standing by!", "roll camera", "camera rolling", "action", and "cut!" are all expressions used on set. "Stand by" and "standing by" coinciding with each other to help the director check that everyone is ready for the camera to roll and for there to be silence within the studio, "stand by" is another phrase for "is everyone alright/ready" although it prevents misjudgment as the question isn't open and the only correct reply is "standing by". "roll camera" is targeted at the camera operator from the director in order to check that the camera works and that if there is a problem it can be solved before the scene takes place, moreover, by the camera operator replying "camera rolling" this means that there is little error for mistakes such as forgetting to press record as the reiteration of orders act as reminders and prevent mistakes. Finally, "action" states the beginning of the scene whereby the 'action' begins and "cut" signifies the end of the scene whereby the camera can be stopped. Although its important that the camera doesn't stop rolling until directed to by "cut" as footage taken may be more necessary than thought when it comes to editing later on.

Finally, it is important to not watch the footage back on set as not only is it expensive to rent out studios and locations and not only is it a waste of money, its a waste of time that you could be spending on filming additional clips. Also, often when actors see themselves back on set they critique themselves, which often results in a change in their mindset as they care more about what they look like instead of what they're doing.


Camera Workshop 1

On Monday 17th January my class and I attended a camera workshop. We were introduced to a Black magic 4K mini URSA camera as well as a tripod and we learned how to put it up effectively and safely. Matt taught us the "yours and mine" rule, whereby when we hand over heavy/expensive objects such as a camera to our peers we state whether we're holding it "mine" or the other person is holding it "yours" this rule is effective as preventing accidents from happening. 

To use the tripod correctly, it is recommended to adjust the height from the bottom up, whereby you fix the height of the lower part of the legs before adjusting the height of the higher up bit, this means that the height is A) more adjustable and B) if you were to do it the other way round, the camera would not be so stable. On the tripod, there's a spirit level that tells you the stability of the camera, this can be adjusted by a screw just below it- in order to make the camera level, you need to slightly unscrew the top of the tripod in order to make sure that the air bubble is within the circle in the spirit level, then proceed to tighten the tripod top again. By making it level this means that the shot you're filming is stable and not veering to the side at all or skewed. 

A crucial skill we learned was how to focus and zoom the camera, in order to focus the camera you need to be able to zoom... to zoom in on something you rotate the zoom ring (which is the ring closer to the lens) and point the lens at what you want to shoot, then to adjust the focus you turn the focus ring until the image on your screen is clear. It's extremely effective to zoom in before you adjust your focus because although something may look as though it's focused, by zooming you're able to get a crisp image, that's why when setting the focus point of a person we always chose their eyes as there is so much intricacy and depth that we're able to see how clear their image is, as appose to focusing on their clothing which could be misleading. 

On the camera, above the lens dismount button is a blue trigger-like button leaver which helps to adjust the brightness, this is useful when changing scenery such as going from a studio to a location. Although, on this specific camera there was a white balance adjustor on the screen whereby by pressing the "WB" button on the screen the brightness is automatically able to adjust to: being indoors, outdoors, an overcast day, and shade. In the studio the lighting is naturally portrayed as far more yellow/orange, so by changing the white balance it makes the man-made lighting appear as natural; in contrast, outdoors the lighting is shown with a blue undertone, and the white balance fixes this completely.

To conclude, "striking the kit" is necessary, as we have to put everything away in the reverse of putting it up. To begin, we had to turn the camera off, then we removed the battery pack and put the camera lens back on. Next, we carefully took the camera off the tripod and put it in the bag, and finally, we put the tripod away.

Saturday 15 January 2022

getting into a production group

My peers and I all pitched our initial ideas for an opening title sequence, our teacher further put us into groups consisting of 3 or 4 people. I am in a group with, Bea H, Will N, and Cole F; once put into a group we discussed all of our ideas and tried to decide which idea to take forward, although we have settled on two ideas that we will continue to develop and then take forward and make. We have made a Whatsapp group chat in order to delegate jobs and discuss relevant things surrounding our ideas, additionally, we have shared email addresses as well as make each other aware of our houses and when we have free periods in order to know when is best suited to work together. 

Feedback

I presented my opening title sequence idea number 3 to my class and teacher. I received lots of feedback which will help me develop my concept and help me understand how to improve my idea if I were to take it forward.
Many of my peers enjoyed the concept I pitched and said that it was engaging and something they would genuinely like to watch. Although many questions arose which will help improve my idea, including, the sensitivity surrounding the topic I chose, as drink spiking is a serious sensitive social situation at the current time, meaning that taking it forward may be difficult as well as it is not going to be enjoyable for my group and I to research for a long time due to the dark issue. Moreover, my peers were unclear on whether or not the woman in the opening scene dies, I wouldn’t directly tell the audience that she dies although I would suggest her decease through her best friend's emotions later on in the movie. Additionally, it was said that the location of the restaurant would be difficult to recreate as covid will make it extremely tricky to use an actual restaurant which is probably necessary as more often than not restaurants are bustling and big, whereas if I were to film it in the studio this effect wouldn’t be matched or realistic. Although, I could present the restaurant as more low-key whereby if I add ambient diegetic sound of people talking while only focusing on a single table, this could be a solution as it could create the effect of an intense first date which also reflects the tone of the movie.

Our opening title sequence